Organization Authentication Page
Organization administrators can use the Authentication page to configure authentication providers, OIDC single sign-on, and trusted email domains.
The Authentication page in Oxygen Content Fusion allows organization administrators to configure how users can join and log in to the organization.
Accessing the Authentication Page
- Click on your user profile name in the top-right corner of the interface.
- Select Manage organization from the drop-down menu.
- In the organization management interface, click on Authentication in the left navigation panel.
Page Layout and Components
The Authentication page provides options to enable or disable authentication providers and trusted email domains.
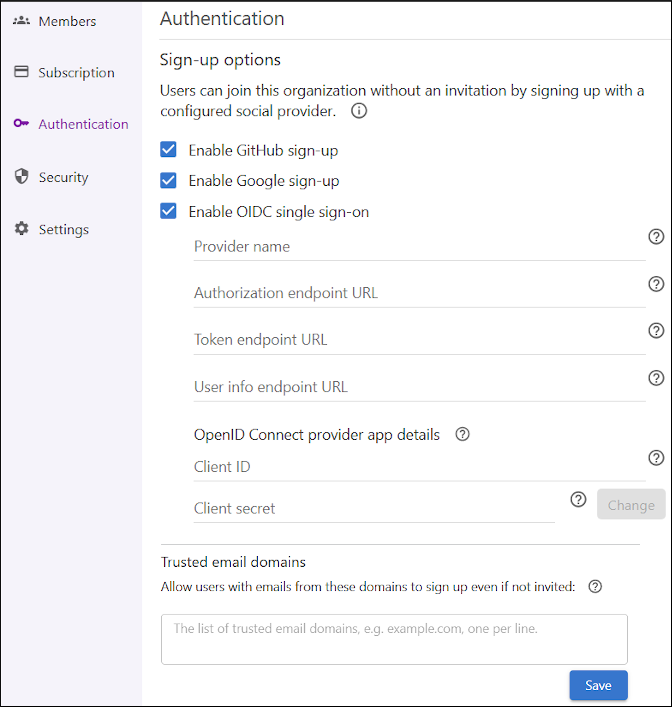
The Authentication page is organized into the following sections:
- Sign-up Options
- Allows administrators to enable or disable sign-up with
GitHub, Google, or OIDC
single sign-on. When enabled, users can join the organization by using
the selected provider without an invitation. However, users who join the organization
through social authentication are not automatically assigned a license. An
administrator must manually assign a license to those users. Tip:By default, Google and GitHub authentication are enabled when an organization is created. The organization administrator can deactivate these providers at any time from this page.
- OIDC Provider Configuration
- When OIDC single sign-on is enabled, additional fields appear
for configuring the provider. To set up OIDC authentication for your organization,
follow these instructions:
- Register an Application - In your OpenID Connect
provider’s administration interface (such as Microsoft Entra ID or Okta), register
a new application for your Content Fusion cloud organization:
- When prompted for a redirect URI, use:
https://<content-fusion-organization-address>/api/oauthc/oidcId/callback(replace<content-fusion-organization-address>with your actual organization address). - After registration, note the Client ID (sometimes called Application ID) and Client Secret.
- When prompted for a redirect URI, use:
- Configure Provider Details in the Content Fusion
Authentication Page:
- Provider Name: The display name for the OIDC provider (e.g., "Okta" or "EntraID").
- Authorization endpoint URL, Token endpoint URL, User
info endpoint URL:
- For Okta: To retrieve the
authorization, token, and user info endpoints,
append
/.well-known/openid-configurationto the Issuer URI of your Authorization Server. You can find the Issuer URI in .For example, your discovery URL might look like:
https://<okta-subdomain>.okta.com/oauth2/<authorizationServerId>/.well-known/openid-configurationwhere you must replace
<okta-subdomain>with your Okta domain, and<authorizationServerId>with the actual ID of your Authorization Server. - For Microsoft Entra ID: To retrieve the
authorization, token, and user info endpoints, use:
https://login.microsoftonline.com/<tenant-id>/v2.0/.well-known/openid-configuration, where you must replace<tenant-id>with the Directory (tenant) ID from your registered application's overview in Azure Portal.
- For Okta: To retrieve the
authorization, token, and user info endpoints,
append
- Client ID - Enter the Client ID (or Application ID in some cases) that was generated when you registered the application.
- Client Secret - Enter the Client Secret that was generated when you registered the application.
- Save Configuration - After entering the required information, make sure you click the button Save.
- Register an Application - In your OpenID Connect
provider’s administration interface (such as Microsoft Entra ID or Okta), register
a new application for your Content Fusion cloud organization:
- Trusted email domains
- Administrators can specify a list of email domains (one per line) that will be trusted and users with email addresses from the specified domains will be allowed to sign up without an invitation. If a user joins from a trusted email domain, the system assigns an SME license if one is available.
- Users who sign up with Google or GitHub do not receive a role automatically. An organization administrator must assign a role to grant appropriate access.
- If a social provider is later disabled, users who originally signed up with it can select Forgot my password to set a password and continue logging in with their email address.