Personal Workspace
When opening a project, it automatically opens in a Personal Workspace, which allows you to make changes across multiple files within a project and then commit them to the project. Editing inside a Personal Workspace means that your changes are private until you commit them to the project's repository.
Once inside the project's personal workspace, the left stripe contains navigation options to open the various project management pages. On the right side of the second top stripe, an Incoming commits widget shows if there are incoming changes and you can click the drop-down to display more information and access additional actions.
When a file (document) is open, it appears in the visual editor (within the main pane to the right of the file tree pane). Whenever a change is made to a document in the visual editor, a Commit Changes button also appears to the right of the Incoming commits drop-down. Clicking this button opens the Changes view where you can commit the changes to the repository.

Branch Management
When a project is open, the second stripe contains a label to make it clear that you are editing inside the Personal Workspace and it includes a branch management drop-down menu. The current branch is displayed inside the box and you can click it to select a different branch (all the Git branches from your project are available).

- Create new branch - Opens a dialog box where you can choose the name for a new branch and an existing branch to base it on.
- Delete branch - Opens a confirmation dialog box where you have the option to delete the current branch.
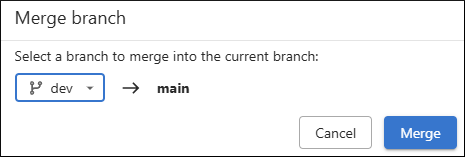
- Merge into current branch - Opens a dialog
box where you can select an existing branch to merge into the current branch.
Figure 3. Merge Branch Dialog Box 
In the Merge Branch dialog box, you can select which branch to merge into the current one. Click Merge to initiate the process. If the merge succeeds without conflicts, a Merge successful message is displayed.
If there are files with conflicting changes, a special branch merging conflict resolution dialog box is initiated where you can choose a merge action for each particular conflict and you can view each version of a conflicted file in a side-by-side comparison view.
