Using a Custom Schema in Your Framework
Oxygen XML Web Author relies on schemas to validate XML documents and to compute valid proposals for the Content Completion Assistant. The built-in frameworks have predefined schemas associated with that particular document type but you can also use your own custom schema.
Supported Types of Schema
- XML Schema 1.0 and 1.1 (with and without embedded Schematron rules)
- DTD
- Relax NG - XML syntax (with and without embedded Schematron rules)
- Relax NG - compact syntax
- NVDL
- Schematron (both ISO Schematron and Schematron 1.5)
Detecting a Schema for Content Completion
- The schema specified in the XML document. In this case, you should set up an XML Catalog mapping to map the schema to a file within the framework, then upload the changes to your framework to Web Author.
- The schema specified in the framework configuration.
Detecting a Schema for Validation
To validate documents, Oxygen XML Web Author uses the schemas specified in validation scenarios defined in the particular framework configuration, but only those that have the Automatic Validation option selected.
Associating a Schema in the Framework Configuration
- In Oxygen XML Editor/Author, go to , and edit the document type configuration for your framework (Edit or Duplicate).
- Go to the Schema tab.
- Select the schema type and its URI.
- Click OK on both of the dialog boxes.
- Create an archive that only contains your custom framework folder and upload the changes to your framework to Web Author.
Associating a Schema in Validation Scenarios Defined in the Framework Configuration
- In Oxygen XML Editor/Author, go to , and edit the document type configuration for your framework (Edit or Duplicate).
- Go to the Validation tab.
-
Create or edit a validation scenario:
- To create a new validation scenario, click the
 New button.
 - To edit the properties of an existing validation scenario, double-click it or
select it and click the
 Edit button (you can also use the
 Duplicate button to copy an existing scenario and edit its
properties).
Duplicate button to copy an existing scenario and edit its
properties).
Step Result: The validation scenario configuration dialog box is displayed:
- To create a new validation scenario, click the
-
Add or configure validation units according to your needs. To configure a unit, click the
 Specify
Schema button.
Specify
Schema button.Step Result: The Specify Schema dialog box is displayed:
Figure 1. Specify Schema Dialog Box 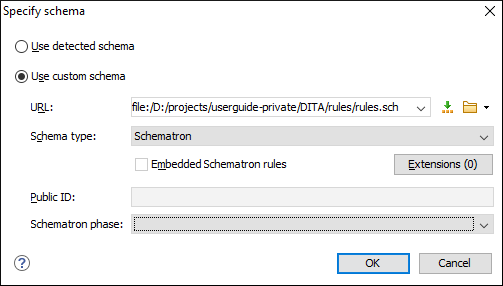
The Specify Schema dialog box contains the following options:
- Use detected schema
- Uses the schema detected for the particular document.
- Use custom schema
- Allows you to specify the schema using the following options:
-
URL - Allows you to specify or select a URL for the
schema. It also keeps a history of the last used schemas. The URL must point
to the schema file that can be loaded from the local disk or from a remote
server through HTTP(S), FTP(S) or a custom protocol. You can specify the URL
by using the text field, the history drop-down, the
 Insert Editor
Variables button, or the browsing actions in the
Insert Editor
Variables button, or the browsing actions in the
 Browse
drop-down list.
Browse
drop-down list. - Schema type - Select a possible schema type from this combo box that is populated based on the extension of the schema file that was entered in the URL field. The possible schema types are: XML Schema, DTD, Relax NG, Relax NG Compact, Schematron, or NVDL.
- Embedded Schematron rules - If you have selected XML Schema or Relax NG schemas with embedded Schematron rules and you want to use those embedded rules, select this option.
- Public ID - Allows you to specify a public ID if you have selected a DTD.
- Extensions- Opens a dialog box that allows you to specify Java extension JARs to be used during the validation.
- Schematron phase - If you select a Schematron schema, this drop-down list allows you to select a Schematron phase that you want to use for validation. The listed phases are defined in the Schematron document.
-
URL - Allows you to specify or select a URL for the
schema. It also keeps a history of the last used schemas. The URL must point
to the schema file that can be loaded from the local disk or from a remote
server through HTTP(S), FTP(S) or a custom protocol. You can specify the URL
by using the text field, the history drop-down, the
- Select the schema to be associated with the validation unit, configure the rest of the options according to your preferences, and click OK.
- Make sure that Automatic Validation checkbox is selected in the validation scenario configuration dialog box.
- Click OK on all of the dialog boxes.
- Create an archive that only contains your custom framework folder and upload the changes to your framework to Web Author.
Customizing Validation Messages
Errors and warnings reported by the validation engine are presented in the Validation side panel, and on a desktop device, if a user hovers over a validation problem, a tooltip is displayed that provides more information about the problem. For any validation item that has a detected Quick Fix, those proposals are also listed. You can create your own custom Schematron Quick Fixes. For more information, see the Schematron Quick Fixes (SQF) section in the Oxygen XML Editor User Manual.
You can also customize the validation messages to include a link (with a More
details label) that sends the user to a web page with more information about
the specific validation problem. If you are using Schematron, this can be done by specifying
a URI in the @see attribute for the particular Schematron rule. For other
types of schema, you can add the link by using the ro.sync.document.DocumentPositionedInfo.setAdditionalInfo(URL) API
method.
There is also a public project in the Oxygen GitHub account pages that offers guidance and instructions for integrating an Intelligent Style Guide for imposing business rules and assisting the content authors. It covers this type of scenario and much more. You can download the project and try it for yourself at: https://github.com/oxygenxml/integrated-styleguide.