Using Web Author with a Git Repository
Oxygen XML Web Author includes a Git plugin that allows you to edit files stored in a Git repository (including GitHub, GitLab, Bitbucket, and generic Git integrations). To access the files in these repositories, it is assumed that your system administrator has enabled and configured this plugin in your installation of Oxygen XML Web Author.
Opening or Creating Files
To open a file stored in a Git repository or create a new file, go to the main Dashboard, click the
tab for your particular Git file repository integration (GitHub, Bitbucket, GitLab, or Git),
and log in. To create a new document, click on New in the top-right
corner. To open an existing document, browse for the file and double-click it (or tap on a
mobile device). If you need to change the repository or branch, click the  Edit button.

 Upload
File button to upload it before selecting it. You can also drag a file from your
system file browser and drop it into the Web Author file browser.
Upload
File button to upload it before selecting it. You can also drag a file from your
system file browser and drop it into the Web Author file browser.Committing Files to a Git Repository
To commit a file to a configured Git repository, select Commit from
the  Git
drop-down menu located on the toolbar (or use the Ctrl + S (Command + S
on OS X) shortcut). If you have push access to the
repository, a Commit on Git dialog box will be opened that allows you
to enter a commit message and choose the branch where the commit will be processed
(you can also edit the name of the branch in this dialog box).
Git
drop-down menu located on the toolbar (or use the Ctrl + S (Command + S
on OS X) shortcut). If you have push access to the
repository, a Commit on Git dialog box will be opened that allows you
to enter a commit message and choose the branch where the commit will be processed
(you can also edit the name of the branch in this dialog box).
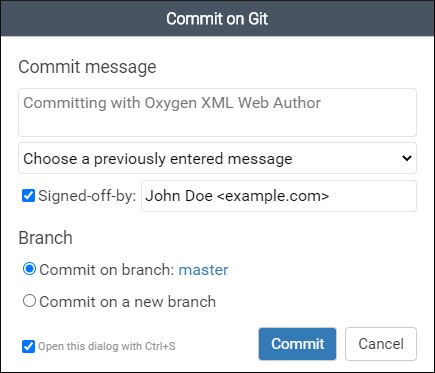
- Commit message - Use this text box to enter a commit message.
- Choose a previously entered comment - Use this history drop-down to select a previously used commit message.
- Signed-off-by - Use this option to specify a person who signed off on
the commit.Attention: This option is only visible if the Allow users to add a Signed-off-by trailer to commit messages option is enabled in your organization's Git configuration.
- Branch - You can choose to commit on the current branch or a new branch. If you choose Commit on a new branch, the new branch will be created automatically and you also have the option to automatically create a pull request.
- Open this dialog with Ctrl+S - If this option is selected, the Commit on Git dialog box can be opened by using the Ctrl + S keyboard shortcut.
If someone else has committed the current document since you last opened it (causing conflicts), a Commit Status confirmation dialog box will appear.
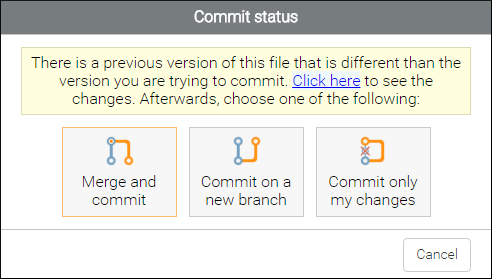
- Click here link - You can click the link at the top of the dialog box to see the difference between the two commits.
- Merge and commit - Merges your changes with versions that were committed by other people and commits the merged changes.
- Commit on a new branch - Creates a new branch that contains your version of the document so that you can merge the changes at a later time, after the conflicts have been solved.
- Commit only my changes - Commits your changes regardless of whether or not there was a conflict, and the changes made by the other user are lost.
- Cancel - Cancels the operation and your changes are not committed to the repository. Before canceling, you could click the link at the top to see the differences, correct the conflicts manually, and then commit afterward using the Commit only my changes option.
Committing to a Repository Without Access Rights
If you try to commit a file on a repository that you do not have access to, a dialog box is displayed that allows you to enter or choose a commit message but you cannot choose a branch. It warns you that continuing will commit the file to a new branch and allows you to create an automatic pull request.

- Fork the project into your account, if it is not already.
- Create a new branch from the edited branch.
- Commit your changes on this newly created branch.
- Create a pull request from your newly created branch to the originally edited branch.
- Switch the editor to your branch so further save operations will just add new commits to your branch, thus updating the pull request with new changes.
Working with and Connecting to a Generic Git Repository Stored on a Central Server
- When you open a file, it is pulled from the original repository.
- When you commit a file, it is automatically pushed to the original repository.
- Go to your repository page (for example, https://github.com/owner/repo) and copy the Git HTTPS URL (usually, this can be found using the Clone action and in some cases, you will need to copy the URL from within the displayed command).
- Go to the Web Author Dashboard and
click the generic
 Git icon.
 - Log in using your repository credentials.
- Paste the repository URL you copied in step 1 into the input field and click Connect.
View on GitHub, GitLab, or Bitbucket
The Git drop-down menu located
on the toolbar includes an action to view the current document on your particular
repository. Depending on your type of configured Git repository, the action is named
View on GitHub, View on GitLab, or
View on Bitbucket. Selecting this action opens the current document
in a new browser tab where you can view the source code in a text editor on GitHub, GitLab,
or Bitbucket.