Creating a New Project
Oxygen XML Editor allows you to organize your XML-related files into projects. This helps you manage and organize your files and also allows you to perform batch operations (such as validation and transformation) over multiple files. You can also share your project settings and transformation/validation scenarios with other users. Use the Project view to manage projects, and the files and folders contained within.
Creating a New Project
To create a new project, select  New Project from the
Project menu, the New menu in the contextual
menu, or the drop-down menu at the top-left of the Project view.
New Project from the
Project menu, the New menu in the contextual
menu, or the drop-down menu at the top-left of the Project view.
This opens a new project wizard:
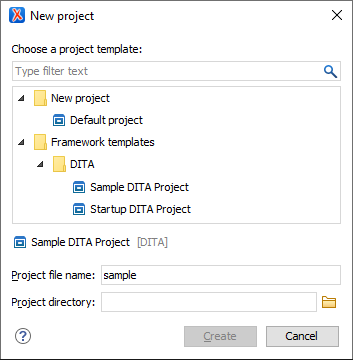
- Sample DITA Project - This is a basic DITA project meant to help new users see how a DITA project is structured.
- Startup DITA Project - This is a startup DITA project that imposes a custom set of options (e.g. spell check settings and custom dictionaries), a custom DITA framework extension (e.g. custom new file templates. custom actions, custom CSS used for visual editing) and a folder structure for a DITA project according to best practices. Once created, the project contains a Readme.html file that explains all customizations and their benefits. If you plan to start your own DITA project using a version control system (such as Git), you can use this startup DITA project template to customize various aspects of DITA editing and share them with your team.
After selecting a project template, you can specify the following:
- Project file name
- Specifies the name of the new project file. Oxygen XML Editor provides a
default proposal for the file name based on the following rules:
- If there is an .xpr file inside the archive, its name is used.
- Otherwise, the name of the template is used.
- Project directory
- Specifies the directory where the archive content will be extracted.Note: The archive should not contain an extra single folder as the root. For the Project directory path to work properly, the archive must have the .xpr file on the first level, along with the other resources (files and folders).
Once you are done, click the Create button to begin the creation process. Oxygen XML Editor extracts the content from the archive inside the path specified in the Project directory field.
Editor Variables in Project Templates
expandEditorVariablesIncludeFilter property. This filter determines the
resources where the editor variables will be resolved. If you need to exclude a subset of
resources from the set specified by the expandEditorVariablesIncludeFilter
property, the expandEditorVariablesExcludeFilter property can be used.*.xpr), framework files
(*.framework), and framework extension scripts (*.exf)
should be excluded from the editor variable resolving process.The values of the inclusion and exclusion filters can be file paths relative to the project directory that can use wildcards or simply wildcards. Each filter can have multiple values, separated by spaces.
./*- Matches all resources from the first level in the project directory.*or./**- Matches all resources on all levels inside the project directory.dir1/dir2/*.dita- Matches all.ditafiles from [PROJECT_DIR]/dir1/dir2, but not from subdirectories of dir2.dir1/dir2/**/*.dita- Matches all.ditafiles from [PROJECT_DIR]/dir1/dir2, including those from subdirectories of dir2.dir1/**/*- Matches all resources on all levels inside [PROJECT_DIR]/dir1.dir1/article1.xml, dir2/article2.xml- Matches only the two.xmlfiles../**/*_suffix.md, ./**/prefix_*.html- Matches all.mdfiles with names that end with_suffixand all.htmlfiles with names that start withprefix_.
Adding Items to the Project
To add items to the project, select any of the following actions that are available when invoking the contextual menu in the Project view:
- New >
 File
File - Opens a New file dialog box that helps you create a new file and adds it to the project structure.
- New >
 Folder
 - Opens a New Folder dialog box that allows you to specify a name for a new folder and adds it to the structure of the project.
- New >
 Logical Folder
 - Creates a logical folder in the tree structure (the icon is a magenta folder on
macOS -
 ).
). - Replicates the structure of a remote folder accessible over FTP/SFTP/WebDAV, as a structure of logical folders. The newly created logical folders contain the file structure of the folder it points to.
 Add Folder
- Adds a link to a physical folder, whose name and content mirror a real folder that
exists in the local file system (the icon of this action is different on macOS -
 ).
).  Add
Files
Add
Files- Adds links to files on the local file system.
 Add
Edited File
Add
Edited File- Adds a link to the currently edited file in the project.
Using Linked Folders (Shortcuts)
Another easy way to organize your XML working files is to place them in
a directory and then to create a corresponding linked folder in your project. If you add new
files to that folder, you can simply use the  Refresh (F5) action from the project contextual menu
and the Project
view will display the existing files and subdirectories. If your files are
scattered among several folders, but represent the same class of files, you might find it
useful to combine them in a logical folder.
Refresh (F5) action from the project contextual menu
and the Project
view will display the existing files and subdirectories. If your files are
scattered among several folders, but represent the same class of files, you might find it
useful to combine them in a logical folder.
Add
Folder in the contextual menu from the project root. Linked folders
are displayed in the Project view with bold text. To create a file inside a
linked folder, select the New > File action from the contextual menu. The linked files presented in the Project view are marked with a special icon.For more information on managing projects and their content, see Project View.
For more details about how you can share projects with other users, see Sharing a Project - Team Collaboration.