Visual Editor
When you click on a file attached to a task, that particular file is opened in the Oxygen Content Fusion visual editor. This is where Reviewers can proofread, propose changes, and add comments in the files. The Content Author can also use this visual editor to view or manage the proposed changes and comments, or to make their own changes. For example, the Content Author can accept or reject changes proposed by Reviewers, add new comments, reply to existing comments, or edit the document directly in the browser interface.
The Oxygen Content Fusion visual editor includes a variety of panes, components, and features. The main editing pane and many of the components and features inherit functionality from Oxygen XML Web Author.
Left Side Pane
- Files
Opens the Task files side-pane. It lists all the files that are attached to the task. You can switch files simply by clicking on the file in this left panel. For DITA projects, if the Content Author specified a context DITA map, this panel shows the hierarchy of all the attached files as they appear in the specified DITA map. The topic title hierarchy from the DITA map is also displayed underneath each topic and if part of it is not shown, you can hover over it to see the entire title hierarchy in a tooltip.
- Task Activity
Opens the Task activity side-pane. It lists the history of the activity that has occurred for the task (e.g. changes and comments). Each activity includes an icon that indicates the type of activity, the name of the user who made a change within the task, and when it was processed. For added files (denoted with this icon:
 ), you can click the highlighted file
name to open the file. For changed files (denoted with this icon:
), you can click the highlighted file
name to open the file. For changed files (denoted with this icon:  ), you can click the highlighted file name to
open the two versions of the document in a file comparison view so that you can
clearly see the differences. You can also hover over the highlighted file name for
changed files, click the ellipsis (3 vertical dots), and select Open
file to simply open the current version of the file in the visual editor
(rather than the file comparison).
), you can click the highlighted file name to
open the two versions of the document in a file comparison view so that you can
clearly see the differences. You can also hover over the highlighted file name for
changed files, click the ellipsis (3 vertical dots), and select Open
file to simply open the current version of the file in the visual editor
(rather than the file comparison).To add a comment to the task, click the ellipsis (3 vertical dots) button in the header and select Add message. Keep in mind that all messages in this panel are attached to the task and not to individual files (to annotate individual files, use the Add Comment button in the editor). For more information, see Task Activity Page.
- Search
Opens the Search side-pane. It allows you to search for specific content in all files attached to the task. You can click on the In reviews tab to filter you search by the Type of content, Author, and/or Time frame.
Main Editing Pane
This editor allows you to review and edit content similar to other common online editors. In most cases, the tracked changes feature will always be on so you and the Content Author can see exactly what was changed and the Content Author will be able to easily accept or reject the changes.
- Smart Paste - When you use copy/paste actions, the built-in Smart Paste feature preserves certain style and structure information.
- Contextual Menu Actions - The contextual menu offers some editing actions that are specific to the type of document you are working with, depending on the specific location within the document.
- Content Completion Assistant - The Content Completion Assistant helps you insert valid XML content. It offers a list of elements, attributes, attribute values, and other options that are valid at the current location. It tries to determine the most logical choice in the current editing context and displays that proposal at the beginning of the list. The feature is activated when you press Enter on your keyboard and you can navigate through the list of proposals by using the Up and Down arrow keys and to insert the selection, simply press Enter again.
- Breadcrumb - The main editing pane includes a breadcrumb stripe that
shows the hierarchical XML structure of the current document, from the document root to
the current element. By default, it is displayed at the bottom of the main editing area.
You can click the double arrow button (
 ) on the right side of the breadcrumb to move it to the top.
The last element listed in the breadcrumb is the element at the current
cursor position. Clicking an element from the breadcrumb selects the entire
element in the editor area.
) on the right side of the breadcrumb to move it to the top.
The last element listed in the breadcrumb is the element at the current
cursor position. Clicking an element from the breadcrumb selects the entire
element in the editor area. - Automatic Spell Checking - The visual editor automatically checks for spelling errors when a document is loaded and every time a modification is made in the document. Words that are detected as spelling errors are underlined with a jagged red line. If you right-click on the word, you are presented with a list of suggestions that you can select from to replace the word and an Ignore option.
- Supported Document Types - The visual editor will open any of the supported XML document types, including DITA, DITA maps, DocBook, XHTML, and TEI. It also provides limited support for some other document types (for example, Markdown documents can opened as read-only in the visual editor).
Toolbar Actions
The editor also includes a toolbar with some common actions along with others that are specific to the type of document (framework):
 Save
Save- Saves the current document.
 Undo
Undo- This action is available after you make a change.
 Redo
Redo- This action is available when you use the Undo action.
 Search
- Opens a popup window that helps you find and replace content in the current document.
 More drop-down
menu
More drop-down
menu- Gives you access to additional general actions, such as options to save, download, or print the document. The Preferences option allows you to select a Tags Display Mode to control the amount of XML markup that is displayed, and you can change the interface language or enable automatic spell checking.
 Add
comment
Add
comment- Allows you to insert a comment on a selected fragment of text. After you add a comment, the content where the comment was added is highlighted in the document and you can see the comment by hovering over the highlighted content or in the Review view.
 Edit Comment
- Opens the Edit Comment dialog box that allows you to edit the selected comment.
 Remove Comment
- Removes a selected comment.
 Previous
Marker
Previous
Marker- Navigates to the previous change or comment.
 Next Marker
- Navigates to the next change or comment.
 Track Changes
Visualization Modes drop-down menu
Track Changes
Visualization Modes drop-down menu- This drop-down menu includes specialized actions that allow you to switch between
the following visualization modes for the Tracked Changes feature:
 View All Changes/Comments - This mode is
active by default. When you use this mode, all tracked changes are
represented.
View All Changes/Comments - This mode is
active by default. When you use this mode, all tracked changes are
represented. View Final - This mode offers a preview of the document as if all
tracked changes (both inserted and deleted) were accepted.
View Final - This mode offers a preview of the document as if all
tracked changes (both inserted and deleted) were accepted. View Original - This mode offers a preview of the document as if
all tracked changes (both inserted and deleted) were rejected. If you attempt to
edit the document in this mode, the view mode will switch to View All
Changes/Comments.
View Original - This mode offers a preview of the document as if
all tracked changes (both inserted and deleted) were rejected. If you attempt to
edit the document in this mode, the view mode will switch to View All
Changes/Comments.
- Framework-Specific Actions
-
Depending on the type of document you are editing, the final section of buttons on the toolbar includes a series of actions defined at framework level. Many of these actions are also available in the contextual menu. Oxygen Content Fusion includes built-in actions for DITA, DITA Map, DocBook, TEI, and XHTML document types.
Figure 2. Example: DITA Toolbar Actions  The framework-specific actions include:
- Styling actions
- Most common styling actions, such as Bold, Italic, Underline.
- Insert actions
- Actions that allow you to insert a variety of framework-specific objects, such as images, equations, tables, paragraphs, links (for example, cross references, file references, or web links in DITA), topic references (DITA map), reusable content references (DITA), relationship tables (DITA map), and others.
- List actions
- Actions that allow you to create ordered and unordered lists, and add new items in them.
- Table actions
- Actions that allow you to create a table and manage its structure (insert and delete rows and columns).
 Insert Special
Character
Insert Special
Character- Opens a dialog box that allows you to select from a large variety of special characters to insert at the current cursor position. The various types of characters include symbols, emoticons, punctuation, and many more.
Right Side Pane
The pane to the right of the editor provides some helper views, each in
its own tab. If the pane is not displayed, click the arrow button (![]() ) on the bottom of the right-side vertical header stripe.
The right pane includes the following tabs (views):
) on the bottom of the right-side vertical header stripe.
The right pane includes the following tabs (views):
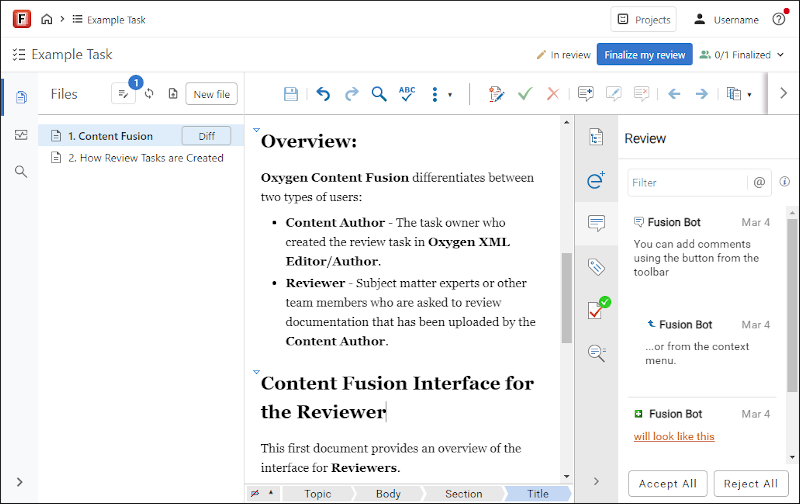
- Review
-
Displays the tracked changes and comments that have been added to the document by you or other content authors. Each change or comment includes actions such as Reply, Mark as Done, Accept or Reject changes, and Change or Remove comments.
Figure 3. Review Tab 
- Attributes
-
Displays the attributes of the selected element and their values. You can also add or edit attributes and their values.
Figure 4. Attributes Tab 
- Validation
-
Provides information about validation problems and offers proposals for resolving them (if a Quick Fix is available).
Figure 5. Validation Tab 
- Find/Replace
-
Provides the ability to search the current file and replace the search terms. It makes it possible to see both the search UI and the document with the results highlighted and without having to scroll through the document.
Figure 6. Find/Replace Tab 
- DITA Map
-
Presents a DITA map as a hierarchical tree. The pane is automatically displayed (collapsed, by default) when you open a DITA map in the editor.
Figure 7. DITA Map Tab 
Referenced Content
If a DITA document contains references to other content (for example, through a
@conref or @conkeyref), as long as the Content Author specified a
Context DITA Map when creating the task, the referenced
content will be displayed in the document but it will be displayed in with a gray background
and cannot be edited directly in the document. It can only be edited from the source
document. To edit the source of the referenced content, click the  icon at the beginning of the
referenced content. This will display the source document above the task files on the left
side of the interface and automatically open it in the editor, but in read-only mode. To
work with the content of this source document, click the Start
editing link at the top-right corner of the editor. Once you start editing the
source document, it becomes part of the task files and the Content Author will see
your changes and comments in this document along with any changes or comments in the rest of
the task files.
icon at the beginning of the
referenced content. This will display the source document above the task files on the left
side of the interface and automatically open it in the editor, but in read-only mode. To
work with the content of this source document, click the Start
editing link at the top-right corner of the editor. Once you start editing the
source document, it becomes part of the task files and the Content Author will see
your changes and comments in this document along with any changes or comments in the rest of
the task files.
Saving Files
All of your changes are saved automatically on the Oxygen Content Fusion server. If you want to save a file manually, use the Save button on the toolbar or the Ctrl + S (Command + S on
macOS) keyboard shortcut. You can also
download the file to your local file system by selecting More /  Download.
Unlocking Files
While you are editing a file, the file remains locked and others cannot
edit it. If other people have the file opened, you will see their avatars on the right side
of the Files box. You can hover over an avatar to see the name of the
person. If someone else is currently editing the particular file, you will see a
 Lock
icon on the left side of the Files box and that person's avatar on
the right side of the Files box will have a red border. When a file
is locked, no one else can edit the file until that person navigates back to the Task Files page, closes the
browser, or uses the Finalize Review button.
Lock
icon on the left side of the Files box and that person's avatar on
the right side of the Files box will have a red border. When a file
is locked, no one else can edit the file until that person navigates back to the Task Files page, closes the
browser, or uses the Finalize Review button.
If you remain inactive for more than 10 minutes, the editor switches to read-only mode and the file is unlocked, which means other users have access to edit it. If other users do not start editing the file, or once they are finished and it becomes unlocked, a Resume Editing button will be displayed that can be used to switch back to editing mode. Note that the lock status is automatically refreshed every minute, so if another user unlocks a file, you may not see the status change for a minute unless you refresh the page manually.
Finalizing a Review Process
When a Reviewer is done reviewing all files attached to the task, they can click the Finalize My Review button that appears in the top stripe. Using this button is a quick and easy way to let the Content Author know that a Reviewer is finished with their review process. Keep in mind that all files attached to the task should be reviewed before using the Finalize My Review button because it applies to the whole task and not to individual files.
Closing a Review
A task owner can close the review process to reserve some time to address the feedback before integrating the changes. To close a task, click the Close review button in the top stripe (with a task opened). This locks the task and prevents others from making changes to the task. If further review is needed, you can click the Reopen review button to make the task editable again.
For tasks created outside a Content Fusion project, once a task owner has integrated the changes into the source documentation project, they can click the Mark as integrated button in the top stripe to archive the task, remove it from visibility for all users, and make it uneditable. A task owner can view integrated (archived) tasks by clicking the Show integrated review tasks button at the bottom of the Owned By Me tab in the My Review Task page.