Configuring Validation Scenarios for a Framework
To associate a validation scenario with a specific framework, follow these steps:
-
To edit an existing scenario, select the scenario and click the
 Edit button. To add a
new scenario, click the
Edit button. To add a
new scenario, click the  New button.
In either case, a scenario configuration dialog box is displayed. It lists all the validation units for the scenario.
New button.
In either case, a scenario configuration dialog box is displayed. It lists all the validation units for the scenario.Figure 1. Validation Scenario Configuration Dialog Box 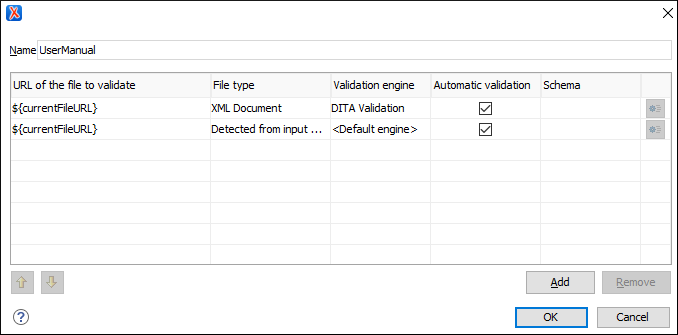 This scenario configuration dialog box allows you to configure the following information and options:
- Name
- The name of the validation scenario.
- URL of the file to validate
- The URL of the main module that includes the current module. It is also the
entry module of the validation process when the current one is validated. To edit
the URL, double-click its cell and
specify the URL of the main module by doing one of the following:
- Enter the URL in the text field or select it from the drop-down list.
- Use the
 Browse drop-down button to
browse for a local, remote, or archived file.
Browse drop-down button to
browse for a local, remote, or archived file. -
Use the
 Insert Editor Variable button to insert an editor variable or a
custom editor
variable.
Insert Editor Variable button to insert an editor variable or a
custom editor
variable.Figure 2. Insert an Editor Variable 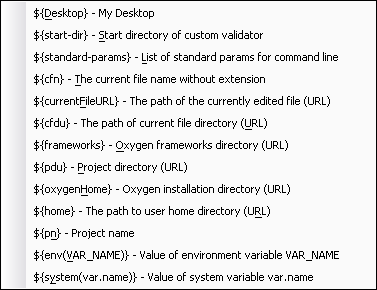
- File type
- The type of the document that is validated in the current validation unit. Oxygen XML Editor automatically selects the file type depending on the value of the URL of the file to validate field.
- Validation engine
-
You can select one of the engines available in Oxygen XML Editor for validation of the particular document type:
- Default engine - The default engine is used to run the validation for the current document type, as specified in the preferences page for that type of document (for example, XSLT preferences page, XQuery preferences page, XML Schema preferences page).
- DITA Validation engine -
Performs DITA-specific checks in the context of the specifications (it is similar to the
process when using the
 Validate and Check for
Completeness action in the DITA Maps
Manager, but for a local file rather than an entire DITA map).
Validate and Check for
Completeness action in the DITA Maps
Manager, but for a local file rather than an entire DITA map). - DITA Map Validation and Completeness
Check engine - Performs a validation process that checks the
DITA map document and all referenced topics and maps (it is similar to the
process when using the Validate and Check for Completeness action in the
DITA Maps Manager).
- DITA-OT Project Validation and Completeness
Check engine - Performs a validation process that checks each
context from the provided DITA-OT project file (it is similar to the
process when using the Validate and Check for
Completeness action in the DITA Maps
Manager).
- Table Layout Validation engine - Looks for table layout problems (for more information, see the Report table layout problems option).
- Automatic validation
- If this option is selected, the validation operation defined by this row is also applied by the automatic validation feature. If the Automatic validation feature is disabled in the Document Checking preferences page, then this option is ignored, as the preference setting has a higher priority.
- Schema
- This option becomes active when you set the File type to XML Document and allows you to specify the schema used for the validation unit.
 Settings
- Depending on the selected validation engine, clicking the Settings button either opens the
Specify Schema dialog box or the Configure
validation engine dialog box.
-
-
Specify Schema Dialog Box
This dialog box allows you to specify a custom schema to be used for the validation process.
Figure 3. Specify Schema Dialog Box 
The Specify Schema dialog box contains the following options:
- Use detected schema
- Uses the schema detected for the particular document.
- Use custom schema
- Allows you to specify the schema using the following options:
-
URL - Allows you to specify or select a URL
for the schema. It also keeps a history of the last used schemas.
The URL must point to the schema file that can be loaded from the
local disk or from a remote server through HTTP(S) or SFTP (or a custom protocol). You can specify
the URL by using the text field, the history drop-down, the Insert Editor
Variables button, or the browsing actions in
the Browse drop-down
list.
- Schema type - Select a possible schema type from this combo box that is populated based on the extension of the schema file that was entered in the URL field. The possible schema types are: XML Schema, DTD, Relax NG, Relax NG Compact, Schematron, or NVDL.
- Embedded Schematron rules - If you have selected XML Schema or Relax NG schemas with embedded Schematron rules and you want to use those embedded rules, select this option.
- Extensions- Opens a dialog box that allows you to specify Java extension JARs to be used during the validation.
- Public ID - Allows you to specify a public ID if you have selected a DTD.
- Schematron phase - If you select a Schematron schema, this drop-down list allows you to select a Schematron phase that you want to use for validation. The listed phases are defined in the Schematron document.
-
URL - Allows you to specify or select a URL
for the schema. It also keeps a history of the last used schemas.
The URL must point to the schema file that can be loaded from the
local disk or from a remote server through HTTP(S) or SFTP (or a custom protocol). You can specify
the URL by using the text field, the history drop-down, the
-
Configure Validation Engine Dialog Box
This dialog box allows you to configure options for checking the DITA map document and all referenced topics and maps (similar to the process done when using theValidate and Check for
Completeness action in the DITA Maps
Manager).Note:The options presented in the Configure validation engine dialog box depends on type of validation engine. For example, when configuring the DITA-OT Project Validation and Completeness Check validation engine, the dialog box has slightly fewer options (omitting those that are not applicable).Figure 4. Example of the Configure Validation Engine Dialog Box 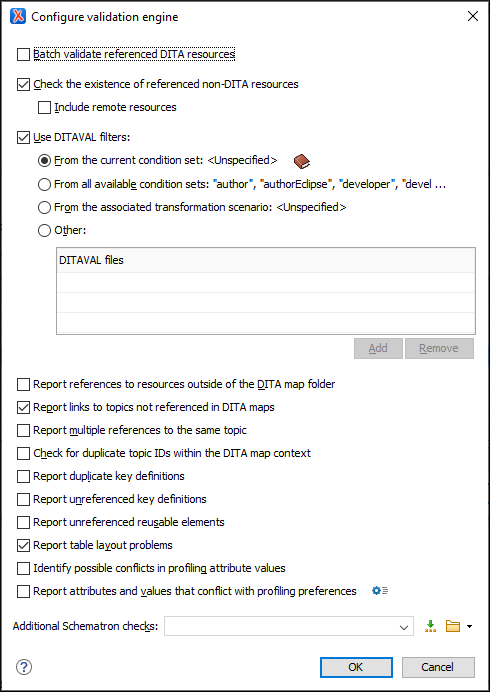 The Configure Validation Engine dialog box contains the following options:
- Batch validate referenced DITA resources
- This option specifies the level of validation that applies to
referenced DITA files:
- If the checkbox is left unchecked (default setting), the DITA files will be validated using the rules defined in the DTD or XML Schema declared in the document.
- If the checkbox is selected, the DITA files will be validated using rules defined in their associated validation scenario.
- Check the existence of non-DITA references resources
-
Extends the validation of referenced resources to non-DITA files.
- Include remote resources
- Select this option if you want to check that remote referenced binary resources (such as images, movie clips, ZIP archives) exist at the specified location.
- Use DITAVAL filters
- The content of the map is filtered by applying a profiling condition
set before validation. You can choose between the following
options:
- From the current
condition set - The map is filtered using the
condition set currently applied in the
DITA Maps Manager view.
Clicking the
 Details
icon opens a topic in the Oxygen XML Editor User Guide that
explains how to create a profiling condition set.
Details
icon opens a topic in the Oxygen XML Editor User Guide that
explains how to create a profiling condition set. - From all available condition sets - For each available condition set, the map content is filtered using that set before validation.
- From the associated transformation scenario - The filtering condition set is specified explicitly as a DITAVAL file in the current transformation scenario associated with the DITA map.
- Other DITAVAL
files - For each DITAVAL file from this list, the
map content is filtered using the DITAVAL file before validation.
Use the Add or
Remove buttons to configure the list. The
Add button opens a dialog box that allows
you to select a local or remote path to a DITAVAL file. You can
specify the path by using the text field, its history drop-down, the Insert Editor
Variables button, or the browsing actions in the Browse drop-down list.
- From the current
condition set - The map is filtered using the
condition set currently applied in the
DITA Maps Manager view.
Clicking the
- Report references to resources outside of the DITA map folder
- If selected, it will report any references to DITA resources that are located outside the main DITA map folder.
- Report links to topics not referenced in DITA maps
- Checks that all the topics referenced by other topics are also linked in the DITA map. Also reports related links defined in relationship tables whose target topics are not referenced in the DITA Map.
- Report multiple references to the same topic
-
If selected, it will report warnings when a topic is referenced multiple times in the DITA map, unless a unique
@copy-toattribute is used on the<topicref>element for any topic that is referenced multiple times.For example, it will not report a warning if there is a topic referenced twice, but the second<topicref>has a@copy-toattribute set:<topicref href="topic.dita"/> ..... <topicref href="topic.dita" copy-to="topic2.dita"/>On the other hand, it will report a warning if there is a topic referenced twice and none of the reference-type elements has a@copy-toattribute set or both of them have the@copy-toattribute set to the same value:<topicref href="topic.dita" copy-to="topic2.dita"/> ...... <topicref href="topic.dita" copy-to="topic2.dita"/> - Check for duplicate topic IDs within the DITA map context
- Checks for multiple topics with the same ID in the context of the entire map.
- Report duplicate key definitions
-
Checks the DITA map for multiple key references with the same key defined for them. This is helpful because if you have two different resources with the same value for the
@keysattribute, all references will point to the first one encountered and the other will be ignored.Note:This option takes key scopes into account. For example, if you have something like this:
it will not report the "k2" key as a duplicate because it is defined in a key scope on the second occurrence.<topicref href="t2.dita" keys="k2"/> <topicgroup keyscope="ks"> <topicref href="t2.dita" keys="k2"/> </topicgroup> - Report unreferenced key definitions
- Checks the entire DITA map and reports any key definitions that are not referenced anywhere. Note that if the Use DITAVAL filters option is selected, this check will search for unreferenced key definitions based upon your selected filter.
- Report unreferenced reusable elements
- Checks the entire DITA map and reports any detected
reusable elements that are not referenced anywhere. It looks for
elements that have an ID specified in the following types of
topic references:
- Any
<topicref>that contains a@processing-roleattribute set to resource-only. - Any other referenced topic that contains
elements that are reused elsewhere through a
@conrefor@conkeyref.
- Any
- Report table layout problems
- Looks for table layout problems. The types of errors that may be
reported include:
- If a row has fewer cells than the number of columns detected.
- For a CALS table, if a cell has a vertical span greater than the available rows count.
- For a CALS table, if the number of
<colspecs>is different than the number of columns detected from the table@colsattribute. - For a CALS table, if the number of
columns detected from the table
@colsattribute is different than the number of columns detected in the table structure. - For a CALS table, if the value of the
@cols,@rowsep, or@colsepattributes are not numeric. - For a CALS table, if the
@namest,@nameend, or@colnameattributes point to an incorrect column name.
- Identify possible conflicts in profile attribute values
- When the profiling attributes of a topic contain values that are not found in parent topic profiling attributes, the content of the topic is overshadowed when generating profiled output. This option reports these possible conflicts.
- Report attributes and values that conflict with profiling preferences
- Looks for profiling attributes and values that are not defined in the Profiling / Conditional Text preferences
page (you can click the Profiling Preferences button to
open this preferences page). It also checks if profiling
attributes defined as single-value have multiple values set in
the searched topics.
- Additional Schematron checks
- Allows you to select a Schematron file that Oxygen XML Editor
will use for the validation of DITA resources. You can
specify the path by using the text field, its history drop-down, the Insert Editor
Variables button, or the browsing actions in the Browse drop-down list.Advanced Tip:Some APIs are available that retrieve information about DITA keys that are referenced within a topic. The APIs can be called from XSLT Stylesheets (including XML Refactoring operations) or Schematron schemas. For details, see API Documentation: DITAXSLTExtensionFunctionUtil.
-
 Move
Up
Move
Up- Moves the selected validation unit up one spot in the list.
 Move Down
- Moves the selected validation unit down one spot in the list.
- Add
- Adds a new validation unit to the list.
- Remove
- Removes an existing validation unit from the list.