Configuring Transformation Scenarios for a Framework
When distributing a framework to users, it is a good idea to have the transformation scenarios already configured. This helps the content authors publish their work in various formats. By being contained in the framework configuration, the scenarios can be distributed along with the actions, menus, toolbars, and catalogs.
To create a transformation scenario for your framework, follow these steps:
-
Create an xsl folder inside your custom framework
directory ([OXYGEN_INSTALL_DIR]\frameworks\[CUSTOM_FRAMEWORK_DIR]).
The folder structure for the documentation framework should be:
oxygen frameworks [CUSTOM_FRAMEWORK_DIR] schema css templates xsl - Create an xsl file and save it in the xsl folder. To help you get started, you can use the sample sdf.xsl file found in the sample framework customization package.
-
Open the
Preferences dialog box and go to
Document Type Associations. Select the particular
framework, click the Edit button to open Document
Type Configuration dialog box, and choose the
Transformation tab. Click the
 New button and choose the
appropriate type of transformation (for example, XML transformation with
XSLT).
In the New scenario dialog box, fill in the following fields:
New button and choose the
appropriate type of transformation (for example, XML transformation with
XSLT).
In the New scenario dialog box, fill in the following fields:- Fill in the Name field with the name of your transformation scenario.
- Set the XSL URL field to path of your custom stylesheet (for example,
${framework}/xsl/mycustom.xsl).
Figure 1. Configuring a New XSLT Transformation Scenario 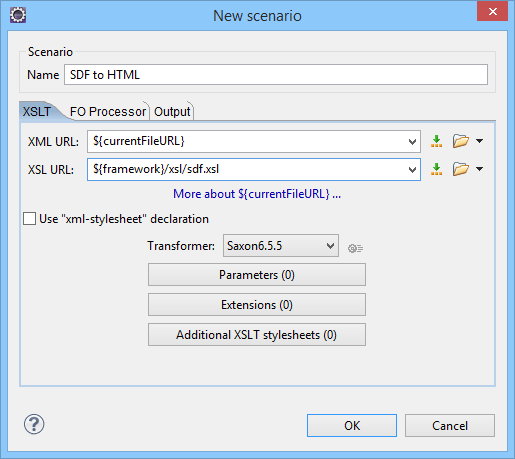
-
Change to the Output tab. Configure the fields as follows:
- Set the Save as field to ${cfd}/${cfn}.html. This means the transformation output file will have the name of the XML file and the html extension and will be stored in the same folder.
- Select the Open in Browser/System Application option.Note:To set the browser or system application that will be used, go to and specify it there. This will take precedence over the default system application settings.
- Select the Saved file option.
- Click the OK button to save the new scenario.
Now the scenario is listed in the Transformation tab:
To test the transformation scenario that you just created, you can use
the sample sdf.xml file found in the sample framework customization package. Click the
 Apply
Transformation Scenario(s) button to display the Transform with dialog
box. The scenario list contains the scenario you defined earlier. Select the SDF to
HTML scenario that you just defined and click the Apply
associated button. The HTML file is saved in the same folder as the XML file
and displayed in the browser.
Apply
Transformation Scenario(s) button to display the Transform with dialog
box. The scenario list contains the scenario you defined earlier. Select the SDF to
HTML scenario that you just defined and click the Apply
associated button. The HTML file is saved in the same folder as the XML file
and displayed in the browser.