Merge Tool
Oxygen XML Web Author includes a file merge tool. It is a useful feature for cases where multiple users work with the same documents concurrently because it can be used to resolve conflicts when committing changes to a repository. It performs a 3-way comparison to show the differences between the your local version of a document and the most recent version committed to the repository by another user since your last commit.
Triggering the Merge Tool
- It is triggered when you select from the
 More drop-down
menu in the main toolbar.
More drop-down
menu in the main toolbar.- This action opens the Merge dialog box if the editor is not read-only and if the file is not part of a concurrent editing session. Otherwise the file comparison tool is opened.
- After you close the dialog box, changes that you merge into the left file (your local version) are synchronized with the main editor.
- When you commit a file to a Git repository and there is a conflict, you are presented with the choice to Merge and commit or Commit to a new branch. If you choose the Merge and commit option, the Merge tool is triggered to help you visualize and resolve the conflict.
- In cases were Web Author is integrated in a CMS, it can be triggered based on an configuration specified by the CMS.
Using the Merge Tool
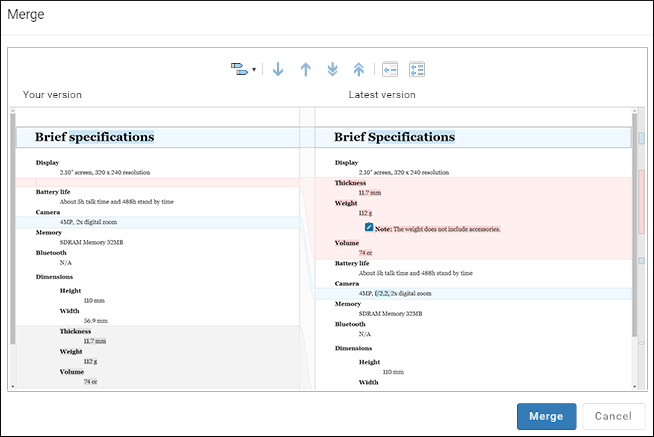
The Merge tool displays two files side-by-side with lines and colored
highlights that help you visualize the differences. The file on the left is your local
version and the left pane is editable (therefore, differences can be merged to the left
pane). The file on the right is the latest version that was committed to the repository by
another user and the right pane is not editable. Differences between the files are
highlighted and the user can navigate between them using the arrow buttons on the toolbar
( ,
,  ,
,  ,
,  ) or clicking on the highlights on
the vertical stripe on the right side. If a base file is provided, the tool will perform a
3-way file comparison.
) or clicking on the highlights on
the vertical stripe on the right side. If a base file is provided, the tool will perform a
3-way file comparison.
- Use the
 Copy Change from Right to Left
toolbar button to copy a specific change or block of changes from the right-side file to
the left.
Copy Change from Right to Left
toolbar button to copy a specific change or block of changes from the right-side file to
the left. - Use the
 Copy All Changes from Right to Left toolbar button to copy all changes
from the right-side file to the left. If a 3-way merge is performed and the editor
identified conflicts, the action will only copy all non-conflicting changes.
Copy All Changes from Right to Left toolbar button to copy all changes
from the right-side file to the left. If a 3-way merge is performed and the editor
identified conflicts, the action will only copy all non-conflicting changes. - You can manually edit the content in the left-side with various
features that include:
- Insert new elements using the Content Completion menu (triggered when pressing Enter).
- Editing actions can be triggered using various keyboard shortcuts (e.g. Ctrl+Z for undo, Ctrl+Y for redo, Ctrl+C for copy, Ctrl+V for paste, Ctrl+B for bold, Ctrl+U for underline, etc.).
- Various editing actions are also available from the contextual menu.
- Editing/styling actions can also be easily triggered using the Floating Contextual Toolbar.
- Find and replace content by using Ctrl+F to trigger a Find/Replace dialog box.
- Add and remove attributes using actions from the contextual menu.
After making changes in the left-side file, new differences between the
two files may be created. The visual highlights of these differences can become out-of-date.
By default, the visual highlights are updated automatically when the user makes changes to
the document. For large documents, this update can take a long time and affect the user
experience, so the editor can be configured to disable this behavior using the
&runDiffOnChange=false URL parameter. In this case, a
 Re-compute Differences
button appears on the toolbar to update the visual highlights.
Re-compute Differences
button appears on the toolbar to update the visual highlights.
Resources
To see a visual demonstration of the Web Author Merge tool, watch our video: