Metadata
DITA has a solid vocabulary for specifying metadata. There are
<prolog> elements in the topics, and
<topicmeta>, <bookmeta> elements in the
bookmaps. They can be used to define authors, dates, audiences, organizations, etc. See: https://www.oxygenxml.com/dita/1.3/specs/archSpec/base/metadata-in-maps-and-topics.html
It is up to you to decide where this information should be presented, in the PDF content or in the PDF document properties.
Metadata - XML Fragment
In the merged
map file, the metadata section is placed inside the
<oxy:front-page> element. This is different from the original
placement in the map or bookmap (after the title), but allows for the usage of information
from it in the title page.
Bookmaps
This is an example of a section taken from a merged bookmap. It only contains some of the
possible metadata elements. The bookmeta metadata section is inherited from
topicmeta:
<bookmap xmlns:ditaarch="http://dita.oasis-open.org/architecture/2005/"
  xmlns:opentopic-index="http://www.idiominc.com/opentopic/index" cascade="merge"
    class="- map/map bookmap/bookmap "
  ditaarch:DITAArchVersion="1.3" >

  <oxy:front-page xmlns:oxy="http://www.oxygenxml.com/extensions/author">

   <bookmeta xmlns:dita-ot="http://dita-ot.sourceforge.net/ns/201007/dita-ot"
     class="- map/topicmeta bookmap/bookmeta ">
     <author class="- topic/author ">Howe Tuduit</author>
     <bookid class="- topic/data bookmap/bookid ">
       <isbn class="- topic/data bookmap/isbn ">071271271X</isbn>
       <booknumber class="- topic/data bookmap/booknumber ">SG99-9999-00</booknumber>
        <maintainer class="- topic/data bookmap/maintainer ">
        <organization class="- topic/data bookmap/organization ">ACME Tools</organization>
        <person class="- topic/data bookmap/person "/>
       </maintainer>
     </bookid>
     <bookrights class="- topic/data bookmap/bookrights ">
        ...
         <bookowner class="- topic/data bookmap/bookowner ">
  <organization class="- topic/data bookmap/organization ">ACME Tools, Inc.</organization>
         </bookowner>
     </bookrights>
        </bookmeta>

        <oxy:front-page-title>
            ...
...
For the DITA Map PDF - based on HTML5 & CSS
transformation type, the merged map is further processed resulting in a collection
of HTML5 <div> elements. These elements preserve the
original DITA @class attribute values and add a new value derived
from the DITA element name.
<div
    class="- map/map bookmap/bookmap bookmap" ... >

   <div class=" front-page/front-page front-page">

   <div
     class="- map/topicmeta bookmap/bookmeta boometa">
     <div class="- topic/author author">Howe Tuduit</div>
     <div class="- topic/data bookmap/bookid bookid">
       <div class="- topic/data bookmap/isbn isbn">071271271X</div>
       <div class="- topic/data bookmap/booknumber booknumber">SG99-9999-00</div>
       <div class="- topic/data bookmap/maintainer maintainer">
          <div class="- topic/data bookmap/organization organization">ACME Tools</div>
          <div class="- topic/data bookmap/person person"/>
        </div>
      </div>
      <div class="- topic/data bookmap/bookrights bookrights">
        ...
         <div class="- topic/data bookmap/bookowner bookowner">
              <div class="- topic/data bookmap/organization organization">
                                          ACME Tools, Inc.
              </div>
         </div>
       </div>
     </div>

     <div class=" front-page/front-page-title front-page-title">
            ...
...
Maps
The maps have a more simple structure, they use the <topicmeta>
element for metadata sections. This is also a simplified example, as there may be many more
elements in the metadata section:
<map xmlns:ditaarch="http://dita.oasis-open.org/architecture/2005/"
    xmlns:opentopic-index="http://www.idiominc.com/opentopic/index"
          cascade="merge" class="- map/map "
    ditaarch:DITAArchVersion="1.3">
    ...

<oxy:front-page xmlns:oxy="http://www.oxygenxml.com/extensions/author">

  <topicmeta class="- map/topicmeta ">
      <author class="- topic/author ">Dan C</author>
      <metadata class="- topic/metadata ">
         <prodinfo class="- topic/prodinfo ">
             <prodname class="- topic/prodname ">oXygen PDF CSS DITA Plugin</prodname>
         </prodinfo>
      </metadata>
      <audience class="- topic/audience "/>
  </topicmeta>
...
For the DITA Map PDF - based on HTML5 & CSS
transformation type, the merged map is further processed resulting in a collection
of HTML5 <div> elements. These elements preserve the
original DITA @class attribute values and add a new value derived
from the DITA element name.
<div xmlns:ditaarch="http://dita.oasis-open.org/architecture/2005/"
    xmlns:opentopic-index="http://www.idiominc.com/opentopic/index"
          cascade="merge" class="- map/map "
    ditaarch:DITAArchVersion="1.3">
    ...

<div class=" front-page/front-page front-page">

  <div class="- map/topicmeta topicmeta">
      <div class="- topic/author author">Dan C</div>
      <div class="- topic/metadata metadata">
         <div class="- topic/prodinfo prodinfo">
             <div class="- topic/prodname prodname">oXygen PDF CSS DITA Plugin</div>
         </div>
      </div>
      <div class="- topic/audience audience"/>
  </topicmeta>
...Metadata - Built-in CSS rules
The [PLUGIN_DIR]/css/print/p-meta.css file contains the rules that extract metadata.
How to Create a Searchable PDF
<keyword> or
<indexterm> elements inside bookmaps, maps, or topics. Most of the
search engines will parse the resulting document and extract those keywords and create a
search base.<keyword> and <indexterm>
elements can be combined inside the <keywords> element. They will be
equally processed by the search engine.Bookmaps
<bookmeta>
element:<bookmap>
...
<bookmeta>
<keywords>
<keyword>web server</keyword>
<keyword>hard disk</keyword>
</keywords>
</bookmeta>Maps
<topicmeta>
element:<map>
...
<topicmeta>
<keywords>
<keyword>flowers</keyword>
<indexterm>care and preparation</indexterm>
<keyword>seasons</keyword>
</keywords>
</topicmeta>Topics
<prolog>
element:<topic>
...
<prolog>
<metadata>
<keywords>
<indexterm>iris</indexterm>
</keywords>
</metadata>
</prolog>How to Add the Publication Audience to the Custom PDF Metadata
<topicmeta> element in a <map> as in
the following
example:<map>
...
<topicmeta>
...
<audience type="programmer" job="programming" experiencelevel="expert"/>To collect the @type attribute, add the following in your customization CSS:
*[class ~= "map/map"] > *[class ~= "map/topicmeta"] > *[class ~= "topic/audience"] {
    -oxy-pdf-meta-custom: "Audience" attr(type);
}*[class ~= "map/topicmeta"]) instead of topicmeta to cover
cases where the elements are specialized (for instance, in a bookmap the
bookmeta is a topicmeta, so your selector will also
function for bookmaps, not only simple maps. map > to choose the
<topicmeta> that is a direct child of the map, not other
<topicmeta> elements from other <topicref>
elements.-oxy-pdf-meta-custom: "Audience" attr(type), "Job" attr(job)
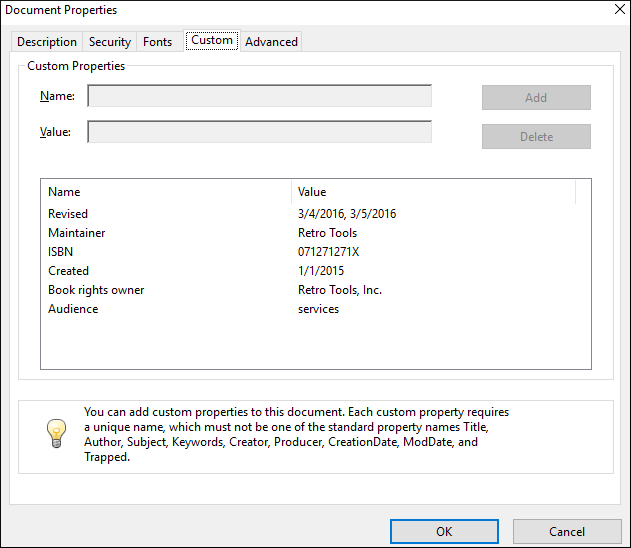
The metadata is displayed in the Custom tab of the Document Properties dialog box from Acrobat Reader:
How to Show Metadata in the Cover Page
- oxy_xpath - Executes an XPath expression and returns string content. Use this whenever you need to extract data from an element other than the one matched by the CSS rule selector.
:after(N)- Creates more than one after pseudo-element. The argument value represents how far the generated content is from the real content. For example, in the second code snippet in the next section, the content of the:afteris closer to the title (upper) than the content of the:after(2).
attr() CSS function can also be used but
it is limited to extracting attribute values from the matched element.Processing Metadata for Bookmaps
<bookmap id="taskbook">
    <booktitle>
        <booklibrary>Retro Tools</booklibrary>
        <mainbooktitle>Product tasks</mainbooktitle>
        <booktitlealt>Tasks and what they can do</booktitlealt>
    </booktitle>
    <bookmeta>
        <author>Howe Tuduit</author>
        <critdates>
            <created date="1/1/2015"/>
            <revised modified="3/4/2016"/>
            <revised modified="3/5/2016"/>
        </critdates>
        <bookid>
            <isbn>071271271X</isbn>
            <booknumber>SG99-9999-00</booknumber>
... <booktitle> element content is
displayed on the first page of the PDF, so if you need to add the information after it, in
your customization CSS, add the
following CSS
rules:*[class ~= "bookmap/booktitle"]:after {
display: block;
content: "by " oxy_xpath('//*[contains(@class, " bookmap/bookmeta ")]/*[contains(@class, " topic/author ")]/text()');
margin-top: 4em;
text-align: center;
color: gray;
}
*[class ~= "bookmap/booktitle"]:after(2) {
display: block;
content: oxy_xpath('if(//*[contains(@class, " bookmap/isbn ")]) then concat("ISBN ", //*[contains(@class, " bookmap/isbn ")]/text()) else ""');
text-align: center;
color: gray;
}Processing Metadata for DITA Maps
<map>
  <title>Growing Flowers</title>
  <topicmeta>
    <critdates>
      <revised modified="2021-04-26"/>
    </critdates>
...<title> element content is displayed on the first page of
the PDF. If you need to add the information after it, add the following CSS rules in your
customization
CSS:*[class ~= "front-page/front-page-title"] > *[class ~= "topic/title"]:after {
display: block;
content: "last revision " oxy_xpath('(//*[contains(@class, " map/topicmeta ")])[1] \
//*[contains(@class, " topic/revised ")]/@modified');
margin-top: 4em;
text-align: center;
color: gray;
}[1] predicate is used to
avoid duplicated results as the topicmeta is included in all children
topics.Generating Synthetic Pages for Metadata
Suppose you need to show this information on a page that follows the title page, instead of on the title page. In this case, you need to prepare a named page and place the content in it. Add the following rules in your customization CSS:
@page page-for-meta {
    background-color: yellow; /* Just to see it better*/
    @top-left-corner {
        content:""; /* Remove the default header */
    }
    @top-right-corner {
        content:""; /* Remove the default header */
    }
}

*[class ~= "bookmap/booktitle"]:after {
    page: page-for-meta;
}
*[class ~= "bookmap/booktitle"]:after(2) {
    page: page-for-meta;
}How to Show Metadata in the Header or Footer
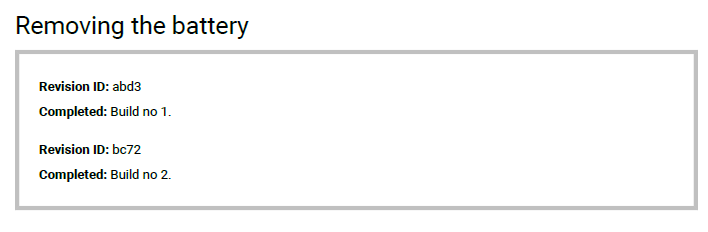
How to Show Metadata Information (Revision History) in the Topic Prologue
This topic explains how to present metadata information that is normally hidden in the published output. For the example that follows, this will be the revision history list:
<task id="task_3ml_qm3_rf">
    <title>Removing the battery</title>
    <shortdesc/>
    <prolog>
        <change-historylist>
            <change-item>
                <change-revisionid>abd3</change-revisionid>
                <change-completed>Build no 1.</change-completed>
            </change-item>
            <change-item>
                <change-revisionid>bc72</change-revisionid>
                <change-completed>Build no 2.</change-completed>
            </change-item>
        </change-historylist>
....<prolog> element is hidden
(display:none) and has several properties that make it collapse, even if
the display property is changed.- It has a transparent color.
- The font has size zero.
- The width and height values are zero.
*[class~="topic/prolog"]:has(*[class~="relmgmt-d/change-historylist"] ){
    display:block;
    color:inherit;
    font-size:1rem;
    width:auto;
    height:auto;
}
*[class~="topic/prolog"]:has(*[class~="relmgmt-d/change-historylist"]) > *:not([class~="relmgmt-d/change-historylist"]) {
    display:none;
}<change-item>,
<change-revisionid>, and <change-completed>
(like the descendents of the <change-historylist>) are specializations
of the topic/data element and are also hidden in the output, so you need to
make them visible. In the following selector, you can add more classes, depending on what
elements you want to be visible.
*[class~="relmgmt-d/change-item"],
*[class~="relmgmt-d/change-revisionid"],
*[class~="relmgmt-d/change-completed"] {
    display:block;
}*[class~="relmgmt-d/change-historylist"] {
font-size:1rem;
border: 3pt solid silver;
padding: 0.5em;
}
*[class~="relmgmt-d/change-historylist"]:before {
content: "Revision History:";
font-weight:bold;
}
/* Example of styling some of the descendends of the history list. */
*[class~="relmgmt-d/change-item"] {
    margin:1em;
}
*[class~="relmgmt-d/change-revisionid"]:before {
    content: "Revision ID: " !important;
    font-weight:bold;
}
*[class~="relmgmt-d/change-completed"]:before {
    content: "Completed: "  !important;
    font-weight:bold;
}
In the output, the history list is now visible:
How to Remove or Change the PDF Keywords
The keywords defined in the prolog sections of topics are automatically collected and set as PDF keywords. These are shown by the readers in the PDF document properties window.
If you need to remove them, you can use the following CSS snippet in your customization CSS:
:root {
	-oxy-pdf-meta-keywords:"";
}
To change them, if you have a hard-coded list, you just enumerate each of them in the property content, separating them with comma:
:root {
	-oxy-pdf-meta-keywords:"alpha, beta, gamma";
}
If you need to extract them by other criteria from the merged map, you can use the oxy_xpath() function instead of the hard-coded
list.
How to Remove the PDF Publication Title Property
The title defined in the PDF reader is automatically collected from the map's main title.
If you want to display the map name instead of the title, you can use one of the following rules in your customization CSS:
/*
 * Titles (maps).
 */
*[class ~= "front-page/front-page-title"] *[class ~= "topic/title"]:not([class ~= 'bookmap/booktitle']) {
    -oxy-pdf-meta-title: unset;
}
/*
* Titles (bookmaps).
*/
*[class ~= "front-page/front-page"] *[class ~= "bookmap/booktitle"] > *[class ~= "bookmap/mainbooktitle"] {
-oxy-pdf-meta-title: unset;
}How to Change the PDF Publication Title Property
The <title> element of a bookmap is quite complex and contains
elements for the book library and an alternate title:
 <booktitle>
    <booklibrary>Retro Tools</booklibrary>
    <mainbooktitle>Main Book Title</mainbooktitle>
    <booktitlealt>Book Title Alternative</booktitlealt>
  </booktitle>
For the publication title, the built-in CSS uses only the content of the
<mainbooktitle>. If you want to collect all of the text from the
<booktitle>, you can add the following rule to your customization CSS:
:root {
    -oxy-pdf-meta-title: oxy_xpath('(//*[contains(@class, "bookmap/booktitlealt")])[1]/text()');
    -oxy-pdf-meta-description: "";
}
An XPath expression is used to collect all the <booktitlealt> elements
from the merged map, select the first one, then use its text.
The built-in CSS uses the <booktitlealt> as the PDF description. In the
example above, this property is cleared since it was moved as a title.
How to Use Data Elements from the Map to Create Custom PDF Metadata
To use a key value in the CSS, the key must be referenced from the content (either a topic or map).
If you do not have it referenced, you may force a reference by using the
<topicmeta> or <bookmeta> section of your map
and a <data> element. This has no effect on the published content, but
allows the CSS rules to use its content.
  <bookmeta>
    ....
    <data keyref="my_key"/>
    ....
  </bookmeta>
This is expanded in the merged HTML file to:
<div class="- map/topicmeta bookmap/bookmeta topicmeta bookmeta">
	...
	<div keyref="my_key" class="- topic/data data">
		<div class="- topic/keyword keyword">KEY VALUE</div>
	</div>
	...
</div>
Suppose that you need the expanded key value in the footer of the publication. You can define a
string-set on this data element:
*[class ~= "topic/data"][keyref="my_key"] {
	string-set: key-string content(text);
}
@page {
	@bottom-left {
		content: "My key is: " string(key-string) !important;
	}
}
Or you can use the value from a :before pseudo-element, like the one for the
title:
*[class ~= "topic/title"]:before {
	content: oxy_xpath("//*[contains(@class, 'topic/data')][@keyref = 'my_key']//text()");
}
Another use-case is to use the key as a source for a custom PDF document property:
*[class ~= "topic/data"][keyref="my_key"] {
	-oxy-pdf-meta-custom: attr(keyref) content(text);
}How to Control the PDF Viewer
The PDF document may contain settings for the PDF Viewer. This helps to make the viewing experience common for all of the readers. For example, you can specify the zoom level that the document is presented, or whether the outline view should be displayed.
There are several CSS properties you can use. These properties should be set on the root element. If they are set on multiple elements, the first one will be taken into account.
Examples
-
To hide the PDF Viewer toolbar and menu bar:
:root { -oxy-pdf-viewer-hide-menubar: true; -oxy-pdf-viewer-hide-toolbar: true; } -
To make the document be displayed with a different zoom level:
:root { -oxy-pdf-viewer-zoom: 50%; } -
To make the PDF Viewer just as large as the displayed document (e.g. if there is a zoom level that makes the document smaller, then the window of the viewer will be just as big as the page):
:root { -oxy-pdf-viewer-fit-window: true; } -
If you need the pages to be displayed as a single continuous column (to be able to scroll in a single view port), use:
:root {
  -oxy-pdf-viewer-page-layout: one-column;
}
The supported include:
single-page,two-columns-left, and more. -
To make the document outline view visible, use:
:root {
  -oxy-pdf-viewer-page-mode: use-outlines;
}
The supported values include:
use-thumbs,use-none. For more details, see the list of Chemistry extension CSS properties.