DITA Topic Author Mode Actions
A variety of actions are available for DITA documents that can be found in DITA menu, toolbar, contextual menu, and the Content Completion Assistant.
DITA Toolbar Actions
The following default actions are available on the DITA toolbar when editing in Author mode (by default, most of them are also available in the DITA menu and in various submenus of the contextual menu):
 Bold
Bold- Surrounds the selected text with a
<b>tag. You can use this action on multiple non-contiguous selections.  Italic
- Surrounds the selected text with an
<i>tag. You can use this action on multiple non-contiguous selections.  Underline
- Surrounds the selected text with a
<u>tag. You can use this action on multiple non-contiguous selections.  Link
Actions Drop-Down Menu
Link
Actions Drop-Down Menu-
The following link actions are available from this menu:
- Cross Reference
- Opens the Cross Reference (xref) dialog box that allows you to insert a link to a target DITA resource at the current location within a document. The target resource can be the location of a file or a key that is already defined in your DITA map structure. Once the target resource has been selected, you can also target specific elements within that resource. For more information, see Linking in DITA Topics.
- File Reference
- Opens the File Reference dialog box that allows you to insert a link to a target non-DITA file resource at the current location within a document. The target resource can be the location of a file or a key that is already defined in your DITA map structure. For more information, see Linking in DITA Topics.
- Web Link
- Opens the Web Link dialog box that allows you to insert a link to a target web-related resource at the current location within a document. The target resource can be a URL or a key that is already defined in your DITA map structure. For more information, see Linking in DITA Topics.
- Related Link to Topic
- Opens the Cross Reference (xref) dialog box that
allows you to insert a link to a target DITA resource in a related links
section at the bottom of the current document. The target resource can be the
location of a file or a key that is already defined in your DITA
map structure. Once the target resource has been selected, you can
also target specific elements within that resource. If a related links section
does not already exist, this action creates one. For more information, see
Linking in DITA Topics.Note:
- Related Link to File
- Opens the File Reference dialog box that allows you to insert a link to a target non-DITA file resource in a related links section at the bottom of the current document. The target resource can be the location of a file or a key that is already defined in your DITA map structure. If a related links section does not already exist, this action creates one. For more information, see Linking in DITA Topics.
- Related Link to Web Page
- Opens the Web Link dialog box that allows you to insert a link to a target web-related resource in a related links section at the bottom of the current document. The target resource can be a URL or a key that is already defined in your DITA map structure. If a related links section does not already exist, this action creates one. For more information, see Linking in DITA Topics.
 Insert
Image
Insert
Image- Opens the Insert Image dialog box that allows you to configure the properties of an image to be inserted into a DITA document at the cursor position.
 Insert Media
Resource
Insert Media
Resource- Opens the Insert
Media dialog box that allows you to select and configure the
properties of a media object to be inserted into a DITA document at the cursor
position. The result will be that a reference to the specified video, audio, or
embedded HTML frame is inserted in an
<object>element and it is rendered in Author mode so that it can be played directly from there.  Insert
Section Drop-Down Menu
Insert
Section Drop-Down Menu-
The following insert actions are available from this menu:
 Insert
Section
Insert
Section- Inserts a new
<section>element in the document, depending on the current context.  Insert Concept
- Inserts a new
<concept>element, depending on the current context. Concepts provide background information that users must know before they can successfully work with a product or interface.  Insert Task
- Inserts a new
<task>element, depending on the current context. Tasks are the main building blocks for task-oriented user assistance. They generally provide step-by-step instructions that will help a user to perform a task.  Insert Topic
- Inserts a new
<topic>element, depending on the current context. Topics are the basic units of DITA content and are usually organized around a single subject.  Insert Reference
- Inserts a new
<reference>element, depending on the current context. A reference is a top-level container for a reference topic.  Insert Note
- Inserts a new
<note>element, depending on the current context.  Insert Codeblock
- Inserts a new
<codeblock>element, depending on the current context.
- Insert Intent Question
- Inserts a new special
<data>element that contains a question or intent. The intent can be used to generate Google Structured data content in WebHelp Responsive output.
 Insert
Paragraph
Insert
Paragraph- Inserts a new paragraph at current cursor position.
 Insert step or
list item
Insert step or
list item- Inserts a new list or step item in the current list type.
DITA Contextual Menu Actions
The following actions are available in the contextual menu when editing in Author mode (most of them are also available in the DITA menu at the top of the interface):
 Edit
Attributes
Edit
Attributes- Displays an in-place attributes editor that allows you to manage the attributes of an element.
- Insert submenu
-
This submenu includes the following insert actions that are specific to the DITA framework:
 Insert
Equation
Insert
Equation- Opens the XML Fragment Editor that allows you to insert and edit MathML notations.
- Insert
Note
- Inserts a new
<note>element at the current cursor position. - Insert Code Block
- Inserts a new
<codeblock>element at current cursor position.  Insert Menu Cascade
- Inserts a new
<menucascade>element at current cursor position. - Insert Label
- Inserts a special label keyword in the prolog. The label is helpful for searching WebHelp Responsive output for similar topics with the same label.
- Insert
Paragraph
- Inserts a new
<p>(paragraph) element at current cursor position. - Insert
Section
- Inserts a new
<section>element in the document, depending on the current context. - Insert
Topic
- Inserts a new
<topic>element, depending on the current context. Topics are the basic units of DITA content and are usually organized around a single subject. - Insert Entity
- Allows you to insert a predefined entity or character entity. Surrogate
character entities (range #x10000 to #x10FFFF) are also accepted. Character
entities can be entered in one of the following forms:
- #<decimal value> - e.g. #65
- &#<decimal value> - e.g. A
- #x<hexadecimal value> - e.g. #x41
- &#x<hexadecimal value> - e.g. A
- Style submenu
- This submenu includes the following text styling actions:
- Bold
- Emphasizes the selected text by surrounding it with a
<b>(bold) tag. You can use this action on multiple non-contiguous selections. - Italic
- Emphasizes the selected text by surrounding it with an
<i>(italic) tag. You can use this action on multiple non-contiguous selections. - Underline
- Emphasizes the selected text by surrounding it with a
<u>(underline) tag. You can use this action on multiple non-contiguous selections.  Subscript
- Surrounds the selected text with a
<sub>(subscript) tag, used for inserting a character (number, letter, or symbol) that will appear slightly below the baseline and slightly smaller than the rest of the text.  Superscript
- Surrounds the selected text with a
<sup>(superscript) tag, used for inserting a character (number, letter, or symbol) that will appear slightly above the baseline and slightly smaller than the rest of the text. - Code
- Surrounds the selected text with a
<codeph>tag.  UI
Control
UI
Control- Surrounds the selected text with a
<uicontrol>tag, used to mark up names of buttons, entry fields, menu items, or other interface objects.  Filepath
- Surrounds the selected text with a
<filepath>tag, used to indicate the name, and optionally the location of a referenced file. You can specify the directory that contains the file and other directories that may precede it in the system hierarchy.
- Table Actions
-
A variety of table editing actions are available in the contextual menu when it is invoked on a table (depending on the context, the table-related actions are promoted to the top level of the contextual menu and the Other Actions submenu provides access to the other actions):
- Other Actions submenu
- This submenu give you access to all the usual contextual menu actions.
- Link submenu
-
The following link actions are available from this submenu:
- Cross Reference
- Opens the Cross Reference (xref) dialog box that allows you to insert a link to a target DITA resource at the current location within a document. The target resource can be the location of a file or a key that is already defined in your DITA map structure. Once the target resource has been selected, you can also target specific elements within that resource. For more information, see Linking in DITA Topics.
- File Reference
- Opens the File Reference dialog box that allows you to insert a link to a target non-DITA file resource at the current location within a document. The target resource can be the location of a file or a key that is already defined in your DITA map structure. For more information, see Linking in DITA Topics.
- Web Link
- Opens the Web Link dialog box that allows you to insert a link to a target web-related resource at the current location within a document. The target resource can be a URL or a key that is already defined in your DITA map structure. For more information, see Linking in DITA Topics.
- Related Link to Topic
- Opens the Cross Reference (xref) dialog box that
allows you to insert a link to a target DITA resource in a related links
section at the bottom of the current document. The target resource can be the
location of a file or a key that is already defined in your DITA
map structure. Once the target resource has been selected, you can
also target specific elements within that resource. If a related links section
does not already exist, this action creates one. For more information, see
Linking in DITA Topics.Note:
- Related Link to File
- Opens the File Reference dialog box that allows you to insert a link to a target non-DITA file resource in a related links section at the bottom of the current document. The target resource can be the location of a file or a key that is already defined in your DITA map structure. If a related links section does not already exist, this action creates one. For more information, see Linking in DITA Topics.
- Related Link to Web Page
- Opens the Web Link dialog box that allows you to insert a link to a target web-related resource in a related links section at the bottom of the current document. The target resource can be a URL or a key that is already defined in your DITA map structure. If a related links section does not already exist, this action creates one. For more information, see Linking in DITA Topics.
 Sort
Sort- Available when invoked on a list, it opens a dialog box where you can configure a sorting operation for an entire list or a selection of list items.
- Reuse submenu
-
This submenu includes the following actions regarding reusing content in DITA:
- Extract Topic From Selection
- Creates a new DITA topic from a selection of content in the current topic.
 Search
References ()
Search
References ()-
Finds the references to the
@idattribute value for the element at the current cursor position, in all the topics contained in the current DITA map (opened in the DITA Maps Manager view). If no references are found for the current element, a dialog box will be displayed that offers you the option of searching for references to its ancestor elements.Figure 1. Search References to Ancestors Dialog Box 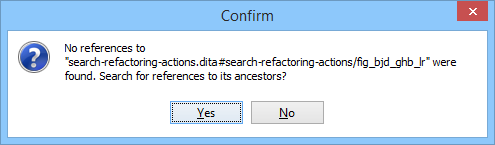 Tip:If you are invoking the action on an image, see Searching for References to Images for details about what will be reported.
 - Find Similar Topics
- Opens the Open/Find Resource view and performs a search using
text content from the
<title>,<shortdesc>,<keyword>, and<indexterm>elements. It is helpful for quickly finding related topics that can be added as related links. - About Element submenu
-
This submenu includes the following actions:
- Style Guide
- Opens the DITA Style Guide Best Practices for Authors in your browser and displays a topic that is relevant to the element at the cursor position. When editing DITA documents, this action is available in the contextual menu of the editing area (under the About Element sub-menu), in the DITA menu, and in some of the documentation tips that are displayed by the Content Completion Assistant.
 Browse reference manual
- Opens a reference to the documentation of the XML element closest to the cursor position in a web browser.
 Go to Definition
- Moves the cursor to the definition of the current element.
- Select submenu
-
This submenu allows you to select the following:
- Element
- Selects the entire element at the current cursor position.
- Content
- Selects the entire content of the element at the current cursor position, excluding the start and end tag. Performing this action repeatedly will result in the selection of the content of the ancestor of the currently selected element content.
- Parent
- Selects the entire parent element at the current cursor position.
- Text submenu
-
This submenu contains the following actions:
- To Lower Case
- Converts the selected content to lower case characters.
- To Upper Case
- Converts the selected content to upper case characters.
- Capitalize Sentences
- Converts to upper case the first character of every selected sentence.
- Capitalize Words
- Converts to upper case the first character of every selected word.
- Count Words
- Counts the number of words and characters (no spaces) in the entire document
or in the selection for regular content and read-only content. Note:The content marked as deleted with change tracking is ignored when counting words.
- Refactoring submenu
-
Contains a series of actions designed to alter the XML structure of the document:
- Review submenu
-
This submenu includes the following actions:
 Track Changes
- Enables or disables the Track Changes support for the current document.
 Accept Change(s) and Move to Next
 Accept All
Changes
Accept All
Changes Reject Change(s) and Move to Next
 Reject All
Changes
Reject All
Changes Highlight
- Enables the highlighting tool that allows you to mark text in your document.
- Colors
- Allows you to select the color for highlighting text.
- Stop highlighting
- Use this action to deactivate the highlighting tool.
- Remove highlight(s)
- Use this action to remove highlighting from the document.
 Manage Reviews
- Opens the Review view.
- Manage IDs submenu
-
This submenu is available for topics that have an associated DTD or schema. It includes the following actions:
 Rename in
- Renames the ID and all its occurrences. Selecting this action opens the Rename XML ID dialog box. This dialog box lets you insert the new ID value and choose the scope of the rename operation.
- Search References
- Searches for the references of the ID. By default, the scope of this action is the current project. If you configure a scope using the Select the scope for the Search and Refactor operations dialog box, this scope will be used instead.
- Search References in
- Searches for the references of the ID. Selecting this action opens the Select the scope for the Search and Refactor operations.
 Search Occurrences in file
- Searches for the occurrences of the ID in the current document.
- Folding submenu
-
This submenu includes the following actions:
- Inspect Styles
- Opens the CSS Inspector view that allows you to examine the CSS rules that match the currently selected element.
- Options
- Opens the Author mode preferences page where you can configure various options with regard to the Author editing mode.
Floating Contextual Toolbar for DITA
Oxygen XML includes a dynamic feature where certain editing contexts will trigger a floating toolbar with common actions that are available in the current editing context.
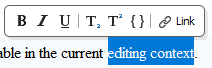
- When a
<p>,<li>, or<shortdesc>element has a selection inside, the floating toolbar includes actions such asBold, Italic,
Underline, a Link submenu, and more. - When an
<image>or<xref>element is selected:- If the element has an
@hrefattribute, the floating toolbar includes a URL chooser where you can select the appropriate target. - If the element has a
@keyrefattribute, the floating toolbar includes a drop-down control where you can select the appropriate target key reference.
- If the element has an
- When an
<object>element is selected:- If the element has a
@dataattribute, the floating toolbar includes a URL chooser where you can select the appropriate target. - If the element has a
@datakeyrefattribute, the floating toolbar includes a drop-down control where you can select the appropriate target key reference.
- If the element has a
- When an element with a
@conrefattribute is selected, the floating toolbar includes actions for editing, removing, or replacing content references. - When a
<codeblock>element is selected, the floating toolbar includes a drop-down control where you can select the value of the@outputclassattribute. - When a
<ul>element is selected, the floating toolbar includes actions for converting it to an ordered list or sorting the list. - When an
<ol>element is selected, the floating toolbar includes actions for converting it to an unordered list or sorting the list. - When an
<li>or<step>element is selected, the floating toolbar includes actions for moving the item up or down in the list/procedure. - When a
<row>or<strow>element is selected in a table, the floating toolbar includes various table-related actions (such as actions for editing table properties, inserting rows, or deleting rows). - When an
<entry>or<stentry>element is selected in a table, the floating toolbar includes various table-related actions (such as actions for editing table properties, inserting/deleting rows, or inserting/deleting columns). - When a
<table>or<simpletable>element is selected, the floating toolbar includes actions for editing table properties or sorting the table.
DITA Drag/Drop (or Copy/Paste) Actions
Dragging a file from the ProjectProject Explorer view or DITA Maps Manager view
and dropping it into a DITA document that is edited in Author mode,
creates a link to the dragged file (the <xref> DITA element with the
@href attribute) at the drop location. Copy and paste actions work the
same.
You can also drag images or media files from your system explorer or the ProjectProject Explorer view and drop
them into a DITA document (or copy and paste). This will insert the appropriate element at
the drop or paste location (for example, dropping/pasting an image will insert the DITA
<image> element with an @href attribute).