Associating a Schema Through a Validation Scenario
Oxygen XML uses the rules defined in the detected schema to report errors and warnings during automatic and manual validations that help maintain the structural integrity of your XML documents. You can specify the schema to be used for validation directly in validation scenarios and there are several methods that can be used to do so.
Configure a Validation Scenario and Specify the Schema
- Select the
 Configure Validation Scenario(s) from the
  Validation toolbar drop-down menutoolbar, or from the
XML menu (or the Validate submenu when invoking
the contextual menu on a file in the Project viewProject Explorer
view).
Validation toolbar drop-down menutoolbar, or from the
XML menu (or the Validate submenu when invoking
the contextual menu on a file in the Project viewProject Explorer
view). - Click the New button to create a new validation scenario or the Edit button to modify an existing one.
-
Add or configure validation units according to your needs and click the
 Specify
Schema button.
Specify
Schema button.Step Result: The Specify Schema dialog box is displayed:
Figure 1. Specify Schema Dialog Box 
The Specify Schema dialog box contains the following options:
- Use detected schema
- Uses the schema detected for the particular document.
- Use custom schema
- Allows you to specify the schema using the following options:
- Select the schema to be associated with the validation unit and configure the rest of the options according to your preferences.
- Click OK on both dialog boxes.
Result: The schema is now associated with that validation scenario whenever it is invoked.
Use the Validate with Action to Specify a Schema for Validating the Current Document
-
Select the Validation with action from the
Validation
drop-down menu on the toolbar (or XML menu).Step Result: The Validate with dialog box is displayed:
Figure 2. Validate with Dialog Box 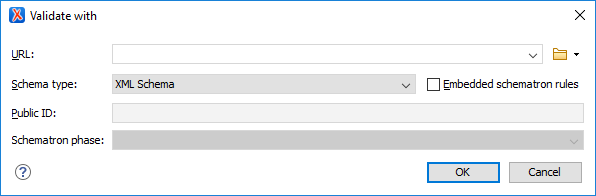 This dialog box contains the following options:
 - Select the schema to be associated with the manual validation and configure the rest of the options according to your preferences.
- Click OK.
Result: The current document is validated using the schema you specified.
Use the Validate with Schema Action to Specify a Schema for Validating all Selected Documents
- Select all the documents you want to validate in the Project view Project Explorer view.
-
Invoke the contextual menu (right-click) and select the Validate with Schema action from the Validate submenu.
Step Result: The Validate with dialog box is displayed:
Figure 3. Validate with Dialog Box
This dialog box contains the following options: - Select the schema that you want to use to validate all selected documents and configure the rest of the options according to your preferences.
- Click OK.
Result: The selected documents are validated using the schema you specified.