Integrating Web Author with Alfresco, SharePoint On-Premise, FileNet
- AlfrescoTip:Authentication to Alfresco is supported via Alfresco Ticket. The application automatically logs the user in if the token is specified in the
alfrescoTicket. - FileNet
- SharePoint On-PremiseNote:By default, Sharepoint On-Premise has the CMIS support disabled, so you need to activate it prior to using the CMIS connector to edit files. See: Microsoft TechNet: How to configure CMIS Procedure in SharePoint.
Configuring the CMIS Connector Plugin
- Go to your Administration Page.
- Select Plugins.
-
Click the
 Configure icon next to the CMIS plugin.
Step Result: This opens the plugin configuration dialog box.
Figure 1. CMIS Connector Plugin Configuration Dialog Box 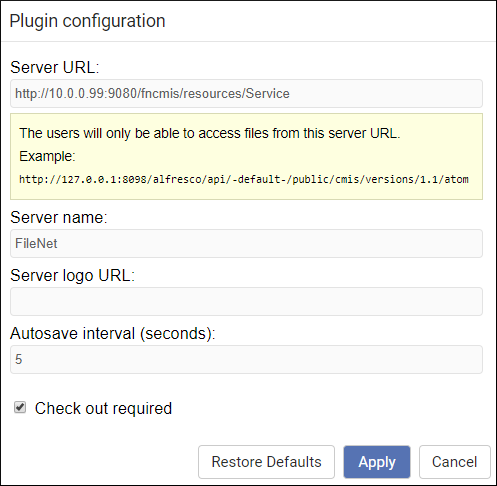
- Enter the options in the Plugin configuration dialog box:
- Server URL - The URL of your server. Examples:
- Alfresco - http://[host]:[port]/alfresco/api/-default-/public/cmis/versions/1.1/atom
- SharePoint On-Premise - http://[host]/_vti_bin/cmis/rest?getRepositories
- SharePoint On-Premise (specific repository) - http://[host]/_vti_bin/cmis/rest/REPOSITORY_ID?getRepositoryinfo
- FileNet - http://[host]:[port]/fncmis/resources/Service
- Server name - This name will appear in the Web Author Dashboard as the name for the tab that users will select to browse files. It will also appear in the Web Author editor interface as the name of a toolbar drop-down menu used for checking out an opened file or checking in modified files.
- Server logo URL (Optional) - You can specify a URL for a logo that will appear in the Web Author Dashboard for the tab that users will select to browse for files.
- Autosave interval (seconds) - Specifies how often modified files are automatically saved.
- Check out required - If you select this option, files will be opened in the Web Author editor in read-only mode and users will need to check out the file to edit it.
- Server URL - The URL of your server. Examples:
- Click Apply.
- Restart .
Configuring a Service Account
In some applications, all users that have access to are trusted. This could happen if the users need to log in before accessing the editor.
- PLUGIN_CUSTOM_OPTIONS.cmis.service.user
- PLUGIN_CUSTOM_OPTIONS.cmis.service.password
<entry>
  <String>PLUGIN_CUSTOM_OPTIONS.cmis.service.user</String>
  <String>example_username</String>
</entry>
<entry>
  <String>PLUGIN_CUSTOM_OPTIONS.cmis.service.password</String>
  <String>example_password</String>
</entry>
Always Show Check-in Comments
Oxygen XML automatically detects if the CMIS server supports check-in comment and it shows the comment text field. It does that by determining if the currently checked-out document already has a comment. If the document was modified outside Oxygen XML, it might not detect a comment and in this case, Oxygen XML does not show the comment.
You can configure the CMIS plugin to always show the check-in comment by
setting the cmis.service.supports_checkin_comment option to true (as
string, not boolean).