Working with Image Maps in DITA
Oxygen XML includes support for image maps in DITA documents through
the use of the <imagemap> element. This feature provides an easy way to create
hyperlinks in various areas within an image without having to divide the image into separate
image files. The visual Author editing mode includes an
Image Map Editor that helps you to easily create and configure image
maps.
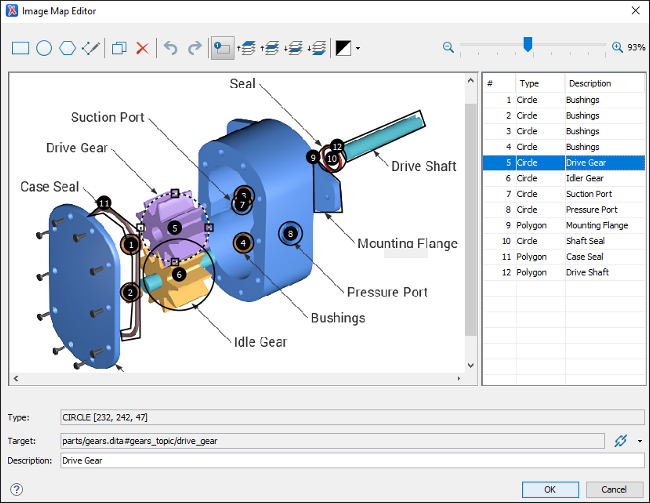
Image Map Editor Interface in DITA
- Image Pane
-
- Shape Table
- The table at the right of the Image Pane is a sequential list of all the areas (shapes) that have been added in the image. It shows their number, type, and description (if one has been added). If you select one of the entries in the table, the corresponding shape will be selected in the Image Pane.
- Properties
-
- Type
- Displays information about the selected coordinate.
- Target
-
Allows you to choose the target resource that you want the selected area (shape) to be linked to. Select a target by using the
 Link
drop-down menu to the right of the text field. You can choose between the
following types of links: Cross Reference,
File Reference, or Web Link.
All three types will open a dialog box that allows you to define the target
resource. This linking process is similar to the normal process of inserting links in DITA by using the identical Link
drop-down menu from the main toolbar.
Link
drop-down menu to the right of the text field. You can choose between the
following types of links: Cross Reference,
File Reference, or Web Link.
All three types will open a dialog box that allows you to define the target
resource. This linking process is similar to the normal process of inserting links in DITA by using the identical Link
drop-down menu from the main toolbar.When you click OK to finalize your changes in the Image Map Editor, an
<xref>element will be inserted with either an@hrefattribute or a@keyrefattribute. Additional attributes may also be inserted and their values depend on the target and the type of link. For details about the three types of links and their dialog boxes, see Inserting a Link in Oxygen XML. - Description
- You can enter an optional description for the selected area (shape) that will be displayed in the Image Map Details section in Author mode and as a tooltip message when the end-user hovers over the hyperlink in the output.
How to Create an Image Map in DITA
-
Right-click the image and select Image Map Editor.
Step Result: This action will apply an image map to the current image and open the Image Map Editor dialog box.
- Add hyperlinks to the image by selecting one of the shape buttons (
 New Rectangle,
  New Circle, or
  New Polygon).
 - Move the shape to the desired area in the image and drag any of the points on the
shape to adjust its size or form. You can use the other buttons on the toolbar to adjust its layer and color, or to
perform other editing actions.Tip:You can right-click any of the points, shapes, or anywhere in the Image Pane to access various helpful contextual menu actions. For example, the easiest way to remove a point is to right-click the point and select
 Remove
Point.
Remove
Point. - With the shape selected, use one of the linking options in the Link drop-down menu to select a target
resource (or enter its path in the Target text field).
- (Optional) Enter a Description for the selected area (shape).
- If you want to add more hyperlinks to the image, select a shape button again and repeat the appropriate steps.
- When you are finished creating hyperlinks, click OK to process your changes.
<alt>
element, its value will be displayed under the image. The following two buttons will also
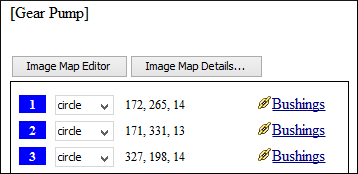
now be available under the image in Author mode:- Image Map Editor - Click this button to open the Image Map Editor.
- Image Map Details - Click this button to expand a section that displays the details of the image map and allows you to change the shape and coordinates of the hyperlinked areas. Keep in mind that if you change the shape in this section, you also need to add or remove coordinates to match the requirements of the new shape.
How to Edit an Existing Image Map in DITA
- Simply double-click the image.
- Right-click the image and select Image Map Editor.
- Click the Image Map Editor button below the image.
You can also click the Image Map Details button below the image to expand a section that displays the details of the image map and allows you to change the shape and coordinates of the hyperlinked areas. Keep in mind that if you change the shape in this section, you also need to add or remove coordinates to match the requirements of the new shape.
Overlapping Areas
If shapes overlap one another in the Image Map Editor, the one on
the top layer takes precedence. The number shown inside each shape represents its layer (if
the numbers are not displayed, click the  Show/Hide Numbers button on the Image Map Editor toolbar). To change the layer
order for a shape, use the layer buttons on the Image Map Editor toolbar (
Show/Hide Numbers button on the Image Map Editor toolbar). To change the layer
order for a shape, use the layer buttons on the Image Map Editor toolbar ( ,
,  ,
,
 ,
,  ).
).
If you insert a shape and all of its coordinates are completely inside another shape, the Image Map Editor will display a warning to let you know that the shape is entirely covered by a bigger shape. Keep in mind that if a shape is completely inside another shape, its hyperlink will only be accessible if its layer is on top of the bigger shape.